This chapter provides procedures that will assist you in setting up Nolan Business Solutions Advanced VAT module. Setup procedures generally need to be completed only once, but you may want to refer to this chapter at other times for instructions on modifying or viewing existing entries.
The information included in this chapter applies to Microsoft Dynamics GP for Microsoft SQL Server.
Setup Checklist
1. Install Advanced VAT for Microsoft Dynamics GP
Follow the installation instructions provided to install the Advanced VAT module for Dynamics GP product.
2. Setup Advanced VAT Options
Refer to the Setting up Advanced VAT Options Tax Details procedure for information about setting up Tax Details.
3. Set up Tax Details
Refer to the Setting up Tax Details procedure for information about setting up Tax Details.
4. Set up General Ledger Account Details
Refer to the Setting up General Ledger Account Details procedure for information about setting up Tax details on General Ledger accounts.
Install Advanced VAT for Dynamics GP.
Before installing Advanced VAT, please ensure that there are no users logged into Dynamics GP as this could adversely affect the installation process.
To install, follow these steps. The process will need to be repeated on all Workstations on which Dynamics GP is installed. However, if Dynamics GP is run from a network (Dynamics.dic is installed in a network location), you will only need to install to on that location.
1. Run the VATREP.EXE install program.
Follow the on-screen instructions to complete the install. The install will ask for the Dynamics GP directory and will install the Advanced VAT chunk file into this directory.
Once the install has completed, start Dynamics GP to load the chunk file.
Form security changes and any necessary file upgrades are not made during the install procedure. Use the Install window to do these automatically by following the steps below (see Appendix A for information on which forms will be affected).
1. Make sure Dynamics GP is running, that you are logged in as ‘sa’ and that no other users are logged in.
2. Select the Nolan Business Solutions folder and the Install VAT Reporting entry in the Shortcuts menu
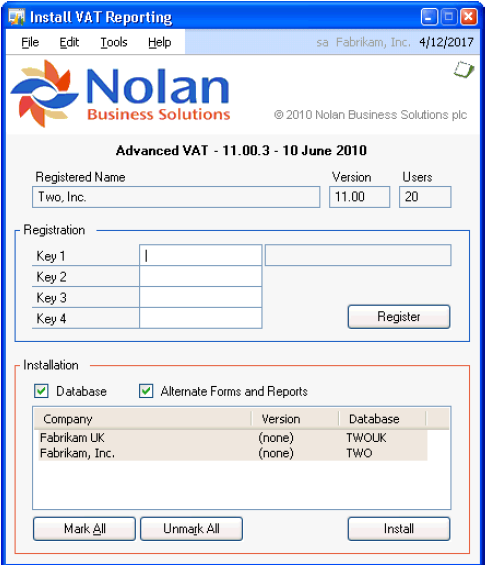
To register Advanced VAT, enter your 8 Digit Registration Keys in the fields provided (You will have received these Registration Keys with your purchase of Advanced VAT). This is required to enable use of Advanced VAT in companies other than the Test Company.
Click on the Register Button, you will receive a message indicating that Registration was successful.
Make sure the ‘Database’ option is ticked to create the tables on SQL and set permissions to them correctly.
Use the Mark/Unmark, Mark All and Unmark All buttons to mark all the companies to install Advanced VAT to. Finally, push the Install button.
Setup Advanced VAT Options
Use the Set-up Tax Details window to define the Tax Detail Rules. These rules define the treatment of the VAT as in Fully Recoverable, Non Recoverable or Partially Recoverable.
1. Open the Advanced VAT setup window
(Setup >> Company >> VAT reporting >> Advanced VAT Setup)
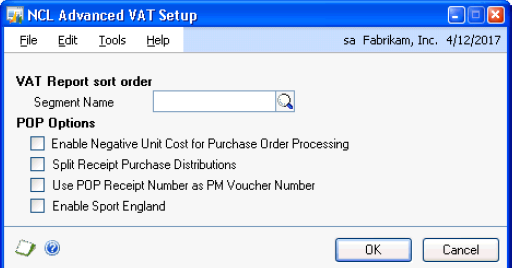
Tick the tick box if you wish to enter negative value lines into Purchase Ledger and Purchase Order Processing.
Setup Tax Details
Use the Set-up Tax Details window to define the Tax Detail Rules. These rules define the treatment of the VAT
as in Fully Recoverable, Non Recoverable or Partially Recoverable.
1. Open the Tax Details Set-up window.
(Setup >> Company >> Tax Details )

(Options Button)

2. Enter the Tax Detail ID Information.
Tax Detail ID - Enter a descriptive Tax Detail ID. You may wish to enter a Tax detail ID that will identify the tax as
sales or purchases, such as PRV for Partial Variable VAT or FRV for Fully Recoverable VAT.
Description - Enter a description which will describe the Tax Detail ID
Type - In the Type list, select either Sales or Purchases.
Tax ID Number - In the Tax ID Number field, enter your tax registration code for this tax, if your country requires it.
Account - In the Account field, enter an account to track taxes paid or received. For example, you might select a Sales Tax Payable account for sales type details and a Sales Tax Expense account or Input Tax Credit account for purchase type details.
History - For the History option, mark one or both of the selections. Mark Calendar Year to track tax detail history by calendar months, which will help you track information that the government may require.
Mark Fiscal Year to track tax detail information for each of the periods you defined for the fiscal year. This information allows you to print reports that accurately reflect activity in each fiscal period.
Based On - From the Based On list, select a tax base. Your selection will determine how taxes for this detail are calculated. In the United Kingdom, general VAT is considered a percent of sale/purchase tax.
Round Up - From the Round Up list, select a method by which you want to round up the tax amount.
Percentage - In the Percentage or Amount field, enter the rate or amount of the tax detail. The name of the field changes depending on your selection in the Based On list.
Based on Detail - In the Based On Detail field, select the tax detail this tax is based on, if applicable.
Taxable Amount - In the Taxable Amount Min and Max fields, enter the minimum and maximum taxable amount for this detail, if applicable. If you don’t enter a minimum or maximum, taxes will be calculated on transactions of any amount.
If there is no maximum taxable amount, don’t enter anything other than 0 in the maximum taxable amount field. If the amount shown in that field is greater than zero, Microsoft Dynamics GP will compare the taxable amount to the maximum each time taxes are recalculated, which can significantly increase processing time. If the amount in the Taxable Amount Max field is 0, Dynamics GP doesn’t perform the comparison and processing time is reduced.
If you entered a minimum or maximum taxable amount, complete the following steps:
a. Use the Include list to select whether to calculate the tax on the full amount of the transaction or only to the amount that’s within the minimum - maximum range of the tax.
b. Use the Qualifiers list to select what the taxable minimum and maximum are compared to when deciding whether the tax should be calculated. The selection you make in the Based On field determines which options appear in the Qualifiers list.
Taxable Tax - If other taxes will be calculated on this tax, mark the Taxable Tax option. For example, if the GST on an item may be in the amount taxed by PST, mark the GST detail as a taxable tax.
If you’re required by law to identify taxes on invoices, complete the following steps:
Print on Documents - Mark the Print on Documents option.
In the field next to Print on Documents, enter a one-character code, such as G for GST or P for PST. The character will appear on your invoices next to each of the items taxed.
Address Button - To enter address information for the taxing authority, choose the Address button. (The address for the tax detail is used on period-end reports for the taxing authority.)
In the Tax Detail Address window, enter the address.
Choose OK to save the address and redisplay the Tax Detail Maintenance window.
Options Button
This button loads the Tax Detail Options Window which has the following fields:
VAT Treatment - Select a VAT Treatment for this Tax Detail ID. The options are:
Fully Recoverable
Part Recoverable – Fixed Percentage
Part Recoverable – Variable Percentage
Non Recoverable
Global Options
The following options apply to the operation of the module for the Tax Detail selected.
Enter Amounts Net/Gross - This option tells the system to expect the values entered excluding VAT i.e Net or including VAT i.e. Gross. The options are Net or Gross (default to Net). If the option is set to Net then the VAT is calculated as an additional value to that entered. If set to Gross then the value entered is assumed to have the VAT already so the VAT calculation must work backwards. For example if Gross and the VAT is 17.5% and the value entered is £117.50 then the VAT is calculated as £17.50 and the final distribution will be £100.00.
Account Options - The options are :
Non-recoverable VAT – Non-recoverable VAT will be posted to a separate account. By default, non-recoverable VAT is posted to the original expense account, if this option is set it will be posted to the nominated account.
Expense Offset – Non-recoverable VAT will be posted to a separate account. By default, non-recoverable VAT is posted to the original expense account, if this option is set it will be posted to the nominated account.
None – No Account Options apply
VAT 100 Option - This allows you to choose whether you want sales/purchases to show on the VAT 100 report
Memo Account - Optionally enter a memorandum Account into the Memo Account field. This field is always available and its entry is optional. If set the system will write irrecoverable VAT amounts to this account.
Destination Tax ID - If Part Recoverable – Variable Percentage is selected, the Destination Tax ID field must be entered.
Change Reason Required - If this is ticked, then if you change the tax detail id from the one defaulted from the account number, you must enter a change reason code.
VAT Accrual Account - Enter an account number which will be used to accrue the VAT for Receipts on Purchase Orders without invoice. This is only available for Partial Recoverable Treatments.
VAT Allocation - This is used to say how the VAT will be allocated for the Partial Recoverable Variable Percentage treatment. If you choose gross then the VAT will be distributed to the purchase account, and the recoverable portion will be deducted later. If you choose net then the VAT will be distributed to the account for the current tax detail id. The VAT will be then be deducted in full later, the recoverable amount put into the destination tax detail id’s account, and the non-recoverable part put in either the non-recoverable tax account (if present) or back into the purchase account.
Non Recoverable Tax Account - This option is only available for Partial Recoverable and Non Recoverable treatments. If it is present, then the non recoverable VAT will be distributed to this account.
Partial VAT Recovery Rate - If Part Recoverable – Fixed Percentage is selected, the Fixed percentage must be entered into the Partial VAT Recovery Rate field.
Examples
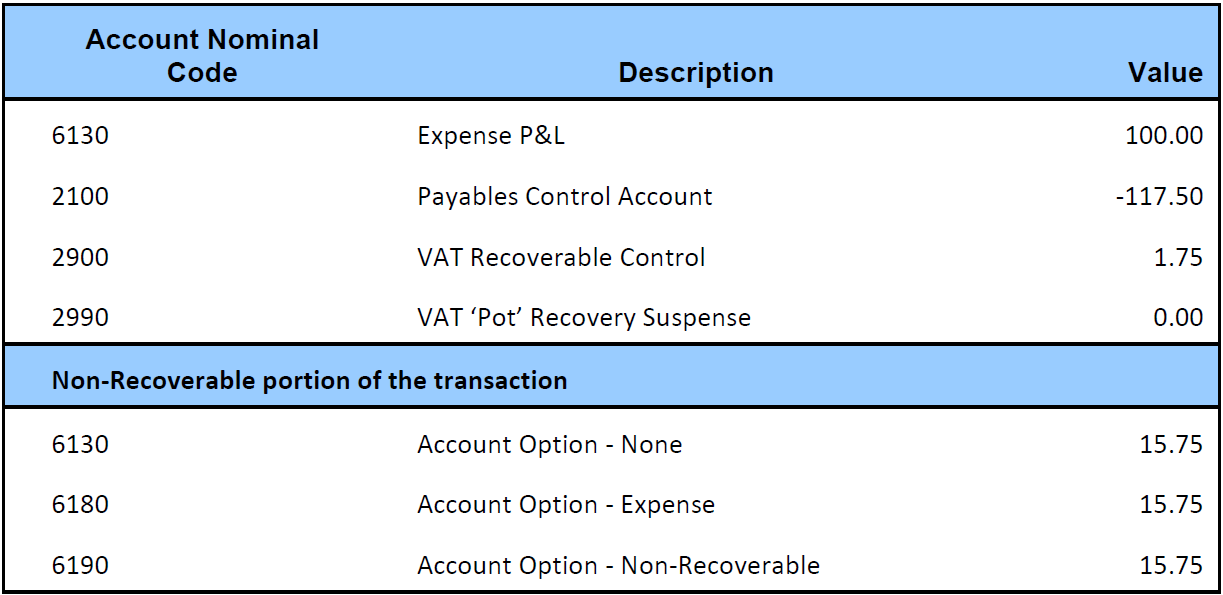
Assume a transaction where the expense value is £100, the VAT percentage is 17.5% therefore the Transaction Value is £117.50 and the VAT Value is £17.50.
The transaction is subject to Partial Recovery i.e. the company is only able to recover a percentage of the VAT expense charged by the supplier but at the time of entry we do not know the percentage that the company can recover. Later we run a separate recovery process where we recover 10% of the VAT.
Taking the scenario above, the transaction will result in the following net change to the accounts described.
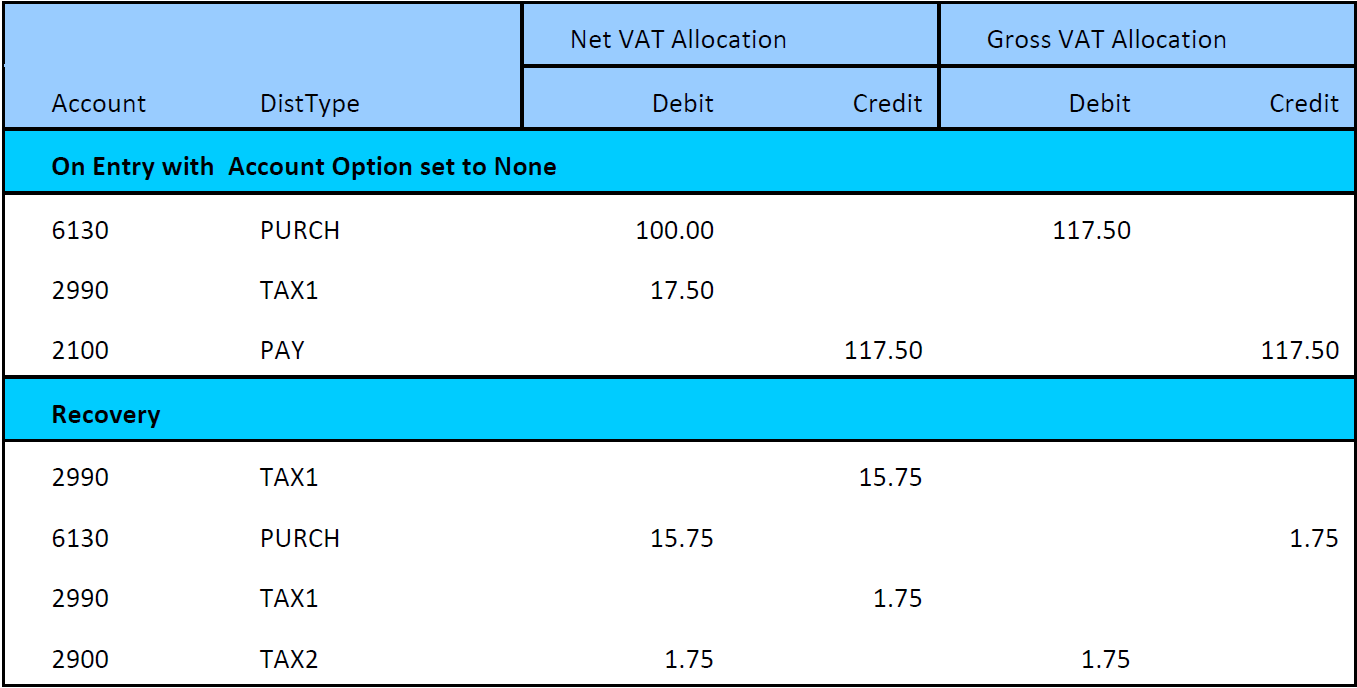
The tables below show the postings for the three different Account Option Settings,
- None
- Expense Account
- Non-Recoverable
The columns show the differences where the VAT Allocation is set to Net or Gross.
If VAT Allocation is set to Net, the system treats the VAT portion of the transaction as fully recoverable.
If VAT Allocation is set to Gross, the system treats the VAT portion as non recoverable.
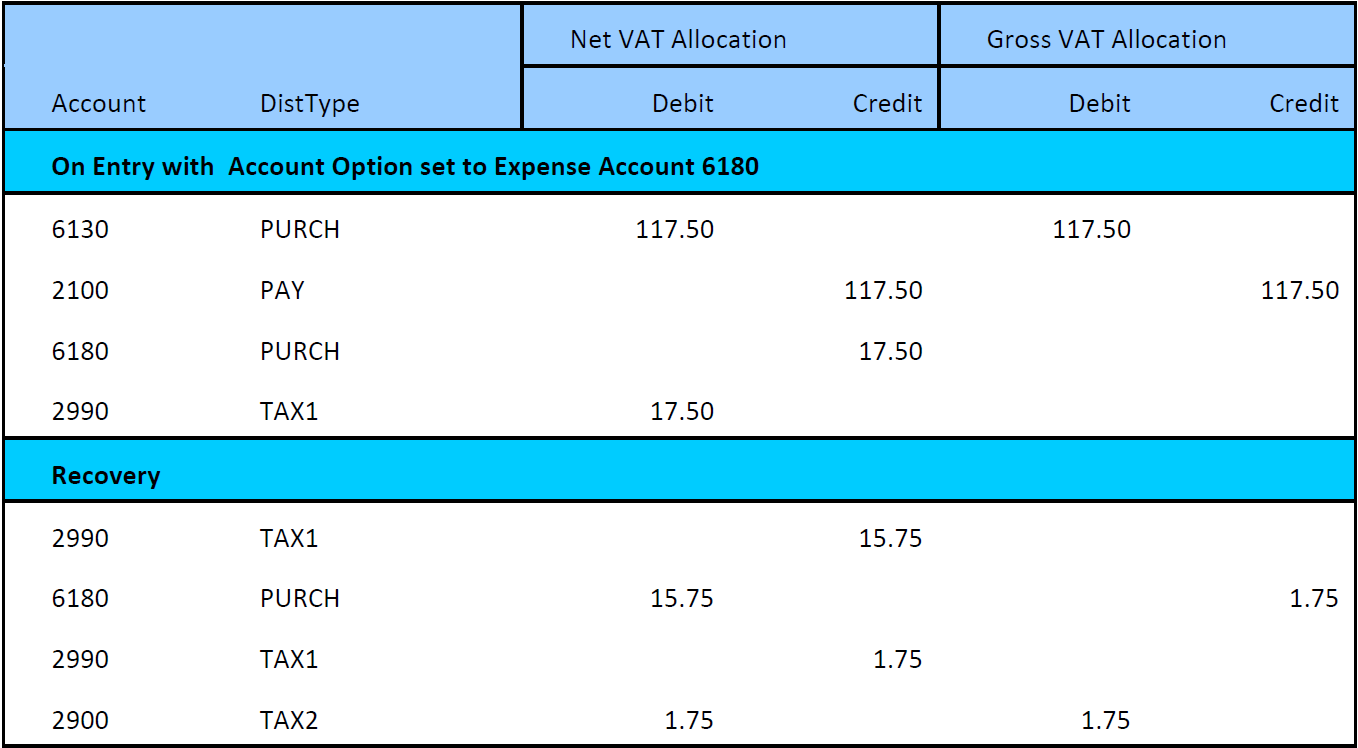

3. Save your information.
Choose Save to save the entries in the Tax Detail Maintenance window.
Choose Cancel to close the window without changing the entries.
Verify your entries with a Tax Detail ID Report. (In the Tax Detail ID field, select a tax detail, then choose File >> Print.)
Setup general ledger account details
Use the Setup General Ledger Account Details window to define General Ledger Accounts and the VAT treatment of these accounts.
1. Open the General Ledger Account Maintenance window.
(Cards >> Financial >> Account)

2. Enter General Ledger Account Details
Account - Enter an account using any combination of letters, numbers or other characters to define the account.
Description - Enter a description of the account and an alias, if you use account aliases. If you’ve loaded a default chart of accounts and want to make changes to a posting account, enter or select the account.
Category - Enter or select the appropriate account category for this account.
Tax Options - Enter whether this account will default to Taxable or Non-taxable.
Tax Detail ID - If the account is set to taxable, enter a Tax Detail ID which will default during Payables or General Ledger Entry. If a Tax Detail ID is entered this will take precedence over and Tax Schedule ID entered.
Tax Schedule ID (optional) - If the account is set to taxable, enter a Tax Schedule ID which will default during Payables or General Ledger Entry. The system will use the Account Tax Schedule ID as entered and the Tax Schedule ID from the Creditor and use the Tax detail which is common in both schedules. If a Tax Detail ID is entered this will take precedence over and Tax Schedule ID entered.
Posting Type - Specify the posting type, that is, whether the account typically appears on the Balance Sheet or the Profit and Loss Statement. This will determine which accounts will be closed at year-end.
Typical Balance - Specify the typical balance, debit or credit. Asset and expense accounts normally have debit balances, while liability, revenue and equity accounts normally have credit balances. For example, your Cash account is an asset account, and it typically should have a debit balance.
Level of posting from series - Select how much detail you want to post to this account from each series, if the transaction origin in the Posting Set-up window is set up to use account settings:
Select Detail if you want to post a separate distribution amount to this account for each transaction in a batch.
Select Summary if you want to post a summarized total for an entire group of transactions to this account.
Include in Lookup - Select the series where you expect to use this posting account; the account will appear in all lookup windows in the selected series.
Budget - Choose Budget to enter a budget for the account (optional). You can set up a budget for the account now or wait until all accounts have been entered.
Currency - Choose Currency to identify the translation method for the exchange rate (Multicurrency Management only) and to select a currency ID.
The translation method selected here will be used when translating financial statements into the reporting currency.