Introduction
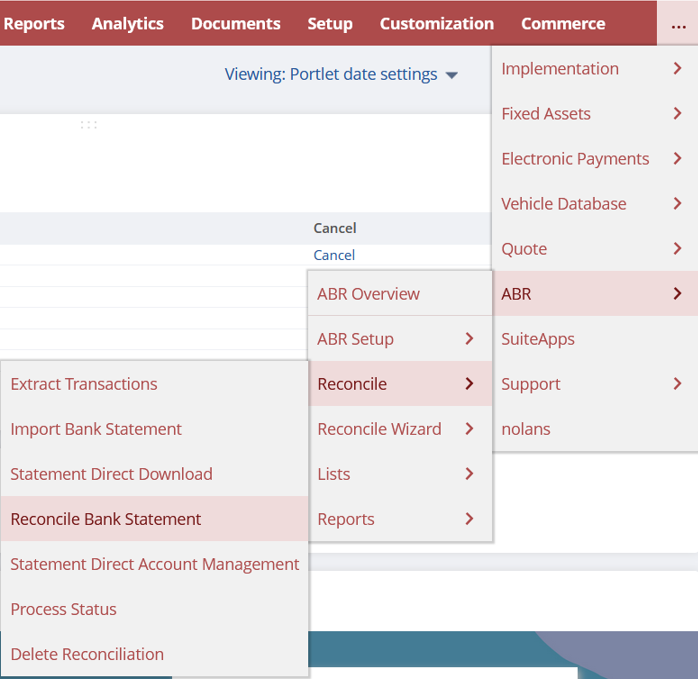
To begin Reconciling go to; ABR -> Reconcile – Reconcile Bank Statement.
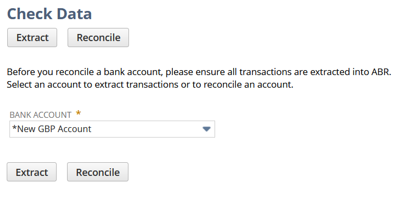
This will bring you to the Check Data screen. Here, select the required Bank Account and select Reconcile.
Bank Details
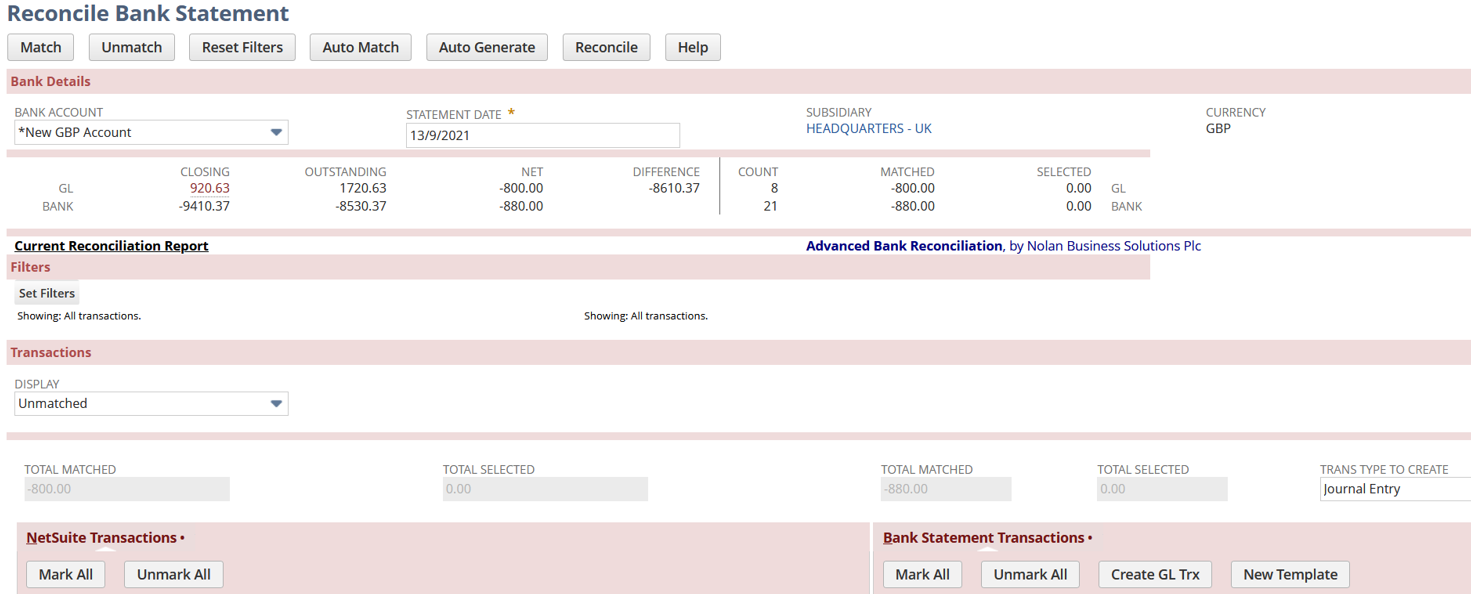
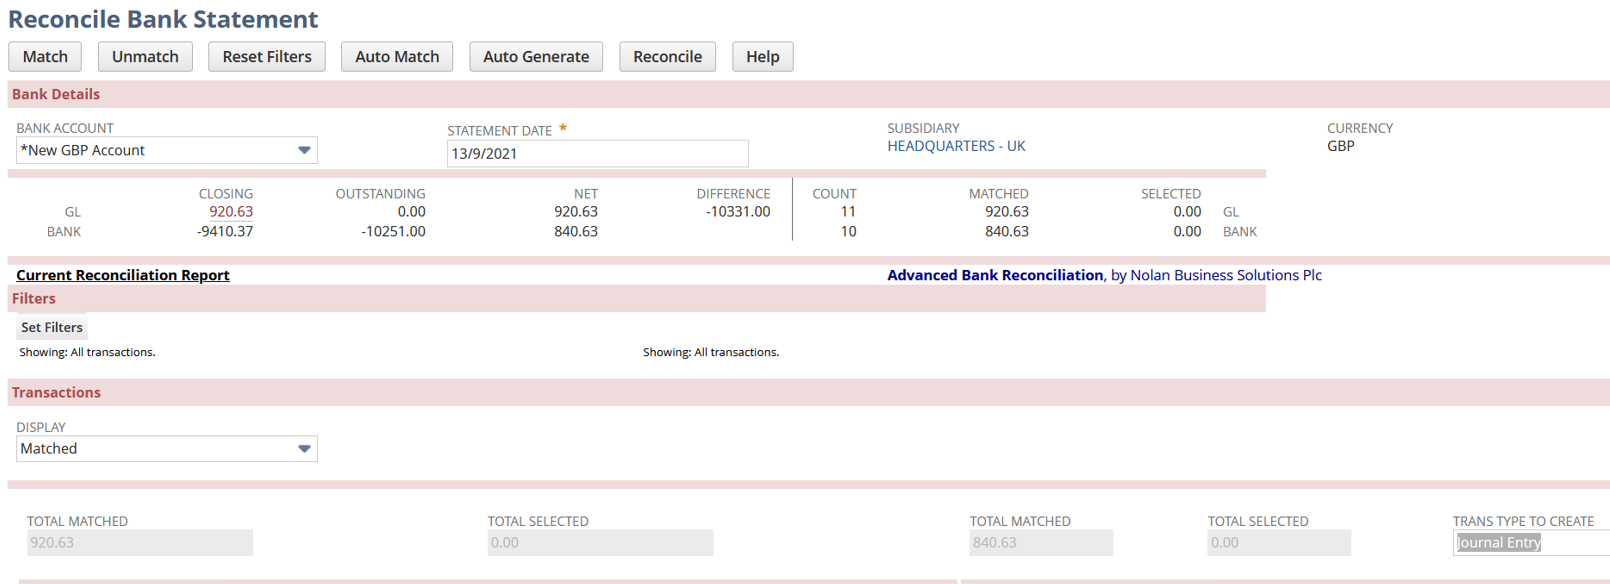
You will now be brought to the Reconcile Bank Statement screen. Here we will go over the details and Fields available when reconciling your statement.
Bank Account – This will be the Bank Account you chose previously on the Check Data screen.
Statement Date – By default, this is the Last Date on the imported Bank Statement. This can be manually changed to show more transactions.
Use the Reconcile Window to verify all Balances have been imported correctly before continuing with the Reconciliation. Some areas to check are listed below.
- General Ledger Closing Amount – This should match the Trial Balance for that General Ledger Account as of the selected Statement Date. If these Do Not match, run the General Ledger extract process. This will bring in any missing NetSuite transactions or Remove any which have been Removed or Deleted in NetSuite since they were originally extracted.
- Bank Closing Amount – This should Match the Bank Statement Balance for that Bank Account as of the selected Statement Date. If they do not match, check for Missing or Duplicate Line Items.
- General Ledger Outstanding – This column displays the Sum of all currently Imported but Unmatched NetSuite
- Bank Outstanding - This column displays the Sum of all currently Imported but Unmatched Bank
- Net – This column displays the Sum of the Closing Amounts Minus the Outstanding Amount for both the Bank and General Ledger.
- Difference – This column shows the Difference between the Bank Closing Amount and the Net General Ledger Amount.
- Matched – This column displays the Sum of all currently Matched NetSuite and Bank Transactions. If these two sums are Not the Same, try changing the Statement Date to a Later
Auto-Match
The Auto-Match button at the top of the screen will begin the auto-match process using the Rules you created earlier. If there are No Rules, the system will match by Amount as default. Without Rules the system will also assume the Bank Transaction Date is the Same as the NetSuite Transaction Date.

An Auto-Match Rule needs to be created to allow the Bank Transaction Date to be Prior to the NetSuite Transaction Date.
Please note: The system will process ALL unmatched Bank Statement Lines even if no matches are found.
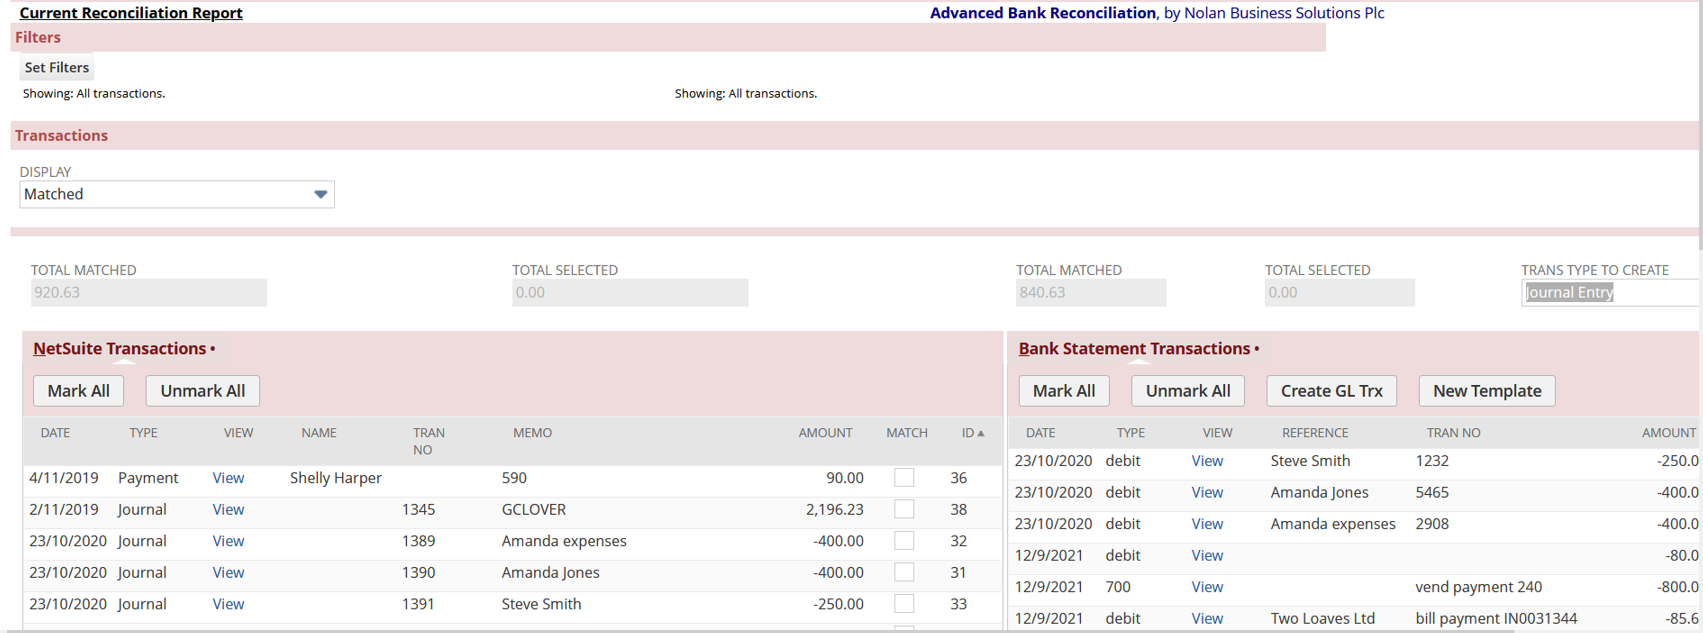
Once you have Matched your transactions, head back to the Reconcile Bank Statement screen. From here, change the Display Field to Matched. This will show you all the transactions which have been matched.
Items that have been successfully matched will have an ID Number in the final column. This ID Number will correspond to each Matched transaction in the General Ledger and Bank Statement.
Manual Matching
You can also Manually Match transactions if desired.
To do this, go to the Reconcile Bank Statement screen and in the Display box, select Unmatched transactions.
Now identify transactions in the General Ledger and Bank which Match and click the Match box beside each transaction.
Note: You can only select transactions on either the NetSuite or Bank side as long as the Total Selected Amount is 0.
If you have Multiple transactions on one side that match with One on the other, you may select all the related transactions on both sides.
Lastly, make sure that the Total Selected box is showing the Same Value for both the General Ledger and Bank.
Now click Match at the top of the screen to Manually Match the selected transactions.
Applying Filters
You can find the Set Filters option below the Current Reconciliation Report tab on the Reconcile Bank Statement screen. This option is useful if you have many unmatched transactions. Or, if you have multiple NetSuite/Bank transactions which need to be matched against one another.

Select the Set Filters option to open the ABR Reconcile – Display Filters window as seen below.
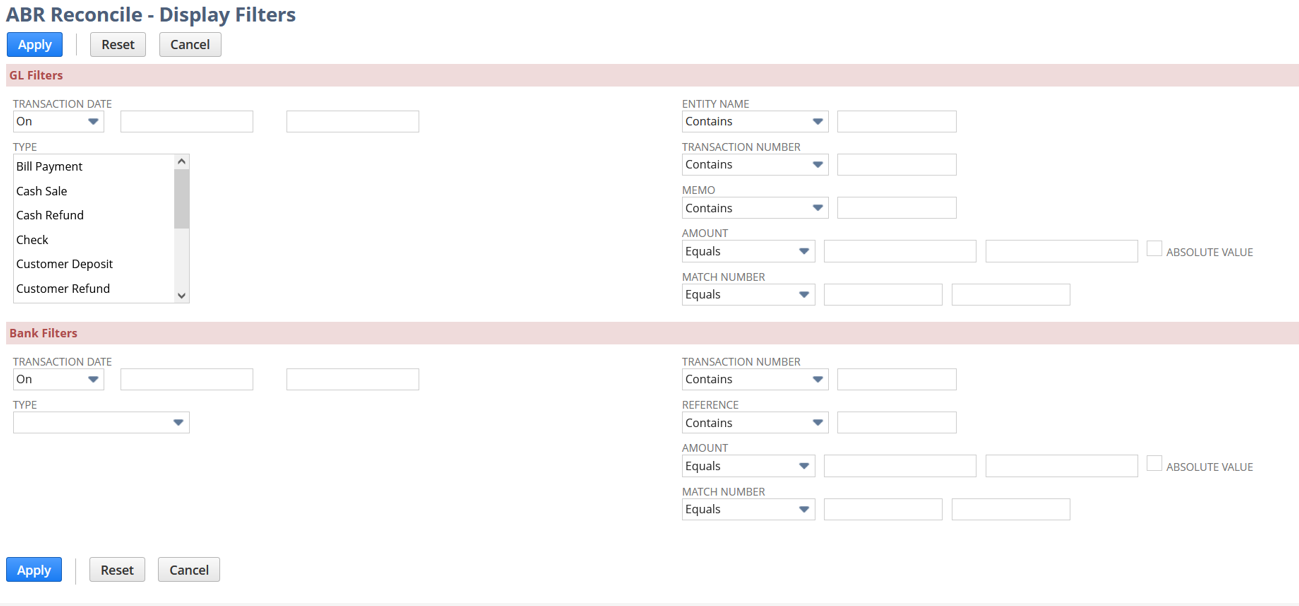
This window is split in two, with General Ledger Filters at the top, and Bank Filters at the bottom. You may use any combination of these filters which suit your needs. Below you will find a detailed list of each Filter Type for both sections.
General Ledger Filters:
- Transaction Date – Select a specific Date or Range to Narrow the NetSuite transactions displayed.
- Type – Select the NetSuite Transaction Type(s) to Narrow the NetSuite transactions displayed.
- Entity Name – Select the NetSuite Entity to Narrow the NetSuite transactions displayed.
- Transaction Number – Select the NetSuite Transaction Number to Narrow the NetSuite transactions displayed.
- Memo – Select the NetSuite Memo Value to Narrow the NetSuite transactions displayed.
- Amount – Select the NetSuite Transaction Amount, Amount Range, or Absolute Value.
- Match Number – Select the Nolan Match ID or Range of Match ID’s. To ensure this filter works correctly, make sure that Reconcile Display is set to show either Matched or All Transactions.
Now the Bank Filters:
- Transaction Date – Select a specific Date or Range to Narrow the Bank transactions displayed.
- Type – Select the Bank Transaction Type to Narrow the Bank transactions displayed.
- Transaction Number – Select the Bank Transaction Number to Narrow the Bank transactions displayed.
- Memo - Select the Bank Memo Value to Narrow the Bank transactions displayed.
- Amount – Select the Bank Transaction Amount, Amount Range, or Absolute Value.
- Match Number - Select the Nolan Match ID or Range of Match ID’s. To ensure this filter works correctly, make sure that Reconcile Display is set to show either Matched or All Transactions.
Un-Matching Transactions
If a transaction has been Matched Incorrectly, it is possible to Un-Match them. Please see the below instructions on how to do this.
- On the Reconcile Bank Statement screen, change the Display box to show Matched
- Find the NetSuite General Ledger and Bank transactions which have been Matched Incorrectly. Now put a tick in the box beside each of these transactions.
- Make sure you have selected Matching Items on Both Sides of the screen and that the Total Selected box is showing the Same Value.
- After reviewing the transactions selected to Un-Match, select Un-Match at the top of the screen.
Creating General Ledger Transactions
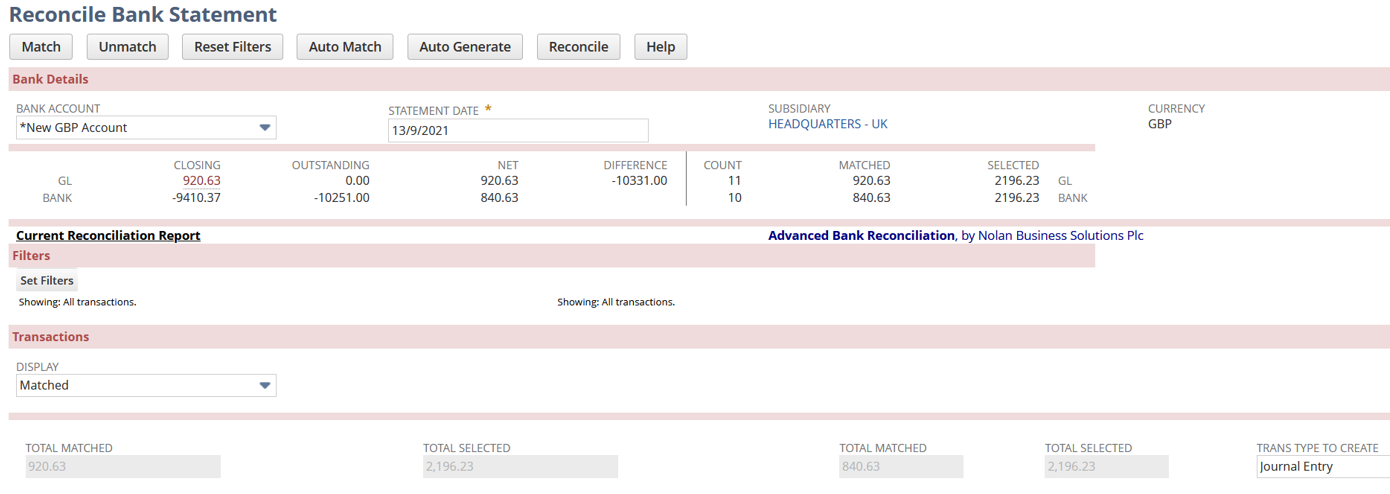
Sometimes you may have Bank Statement Transactions that do not match with any existing General Ledger Transactions. This can happen if you have Bank Fees or Interest Income that was not entered against your General Ledger. These transactions can be processed directly from the Reconcile Window using the Create GL Trx button as seen below.

You can also use this button if you want to record Differences between the amount of a Bank Transaction and the amount of the NetSuite Transaction it needs to be matched against. The Create GL Trx button will record an entry for the Difference between the selected transactions.
To create a new General Ledger Transaction follow the below steps.
- Select at least One Bank Transaction that does Not have a corresponding entry in NetSuite.
- Click the Match box on the right of the Statement Line(s).
- Click Create GL Trx.
- This will open the Journal On this screen, fill in the required fields as you would for a normal Journal Entry and click Add to confirm the new Row.
- Click Save to post the transaction in NetSuite and return to the Reconciliation Window.
The system will now have created a NetSuite Transaction on the Left of the screen, Extracted it into the Reconcile Window and Matched it with the Bank Transaction.
New Template
Rather than using Create GL Trx, you can use an Auto-Gen Template to pick up all the Bank Charges every month. This template only needs to be set up once to pick up all applicable transactions in the future.
Auto-Generate
The Auto-Generate process will search the Bank Statement for any Un-Matched Bank Statement Lines that meet the Template Criteria. If the criteria are met, the system will create a NetSuite Transaction. The transaction will then be Automatically Extracted and Matched in the Reconcile Window.
Reconcile
When all the above steps have been completed, you should have Matches for All the transactions in your Bank Statement. After checking that the information is correct, click the Reconcile button. This will process the Reconciliation, Match the selected transactions, and create a Reconciliation Closing Balance Report showing the Balances.