There are multiple records that are created as part of the Onetrail bundle install. Many of these already contain the information and do not need modifying. However there are certain records that can be populated with records that have functionality used in eInteract.
Customer Shipping Rate
Overview
This enables you to set specific shipping costs per Customer by NetSuite shipping Method. There is currently no shortcut to get to the list of these records, you will need to go to the Custom Records page to view existing and add new.
There are three mandatory fields when creating a new record:
1. Customer
a. Select the name of the Customer that this relates to
b. This is a dropdown to the list of all of your customers in the system
2. Shipping Method
a. Select the NetSuite Shipping Method that this relates to
b. This is a dropdown to the list of all of the shipping methods setup in the system (Lists > Accounting > Shipping Methods)
3. Default Shipping Price
a. Select the default price for this customer and this method. This can be overwritten on the individual order when created
Example, customer A, shipping method is Next Day and price is £5. When I create a Sales Order Customer A and select Next Day as the shipping method, the price £5 will be automatically pulled through.
Permissions
Uses ‘User Permission Type’ so record will need to be added to roles in order for users to create new records.
eInteract Product Classification
Overview
This allows you to create a custom Item/product groupings. This will be be used in the Item Mapping Record. There is currently no shortcut to get to the list of these records, you will need to go to the Custom Records page to view existing and add new.
Onetrail brings through two groups associated to each Item. UNSPSC, which is a universal code and Onetrail Product Group. Both of these are set in fields created in part of the eInteract installation when the item is created. For example for Item CN01, the following is set: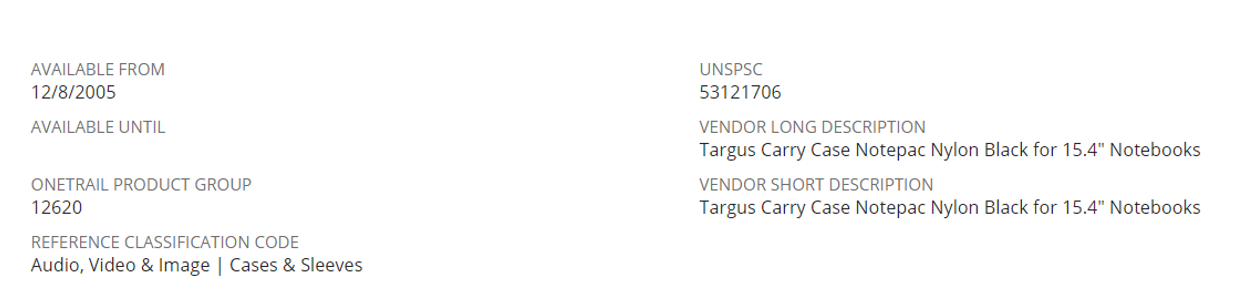
The groupings are both codes which relate to names. Onetrail Group 12620 is ‘Notebook Bags’ and UNSPSC 53121706 is ‘Computer bags’.
Please NOTE the latest list of this should be available internally at Nolans. Onetrail provide an updates list which can be found at: http://www.onetrail.net/docs/PDE/
Only one of these two groups can be used for mappings and you must decide which one, and this should be set in the field Item Group Mapping on the eInteract Configuration page.
All that is required for the eInteract configuration is a list of all the Item/Product groupings you want to use. For example if you decide to use Onetrail Group, you would add a record called ‘Notebook Bags’. The parent field enables you to have a hierarchical grouping as the Onetrail Group is a flat structure. An example of a potential structure is below:
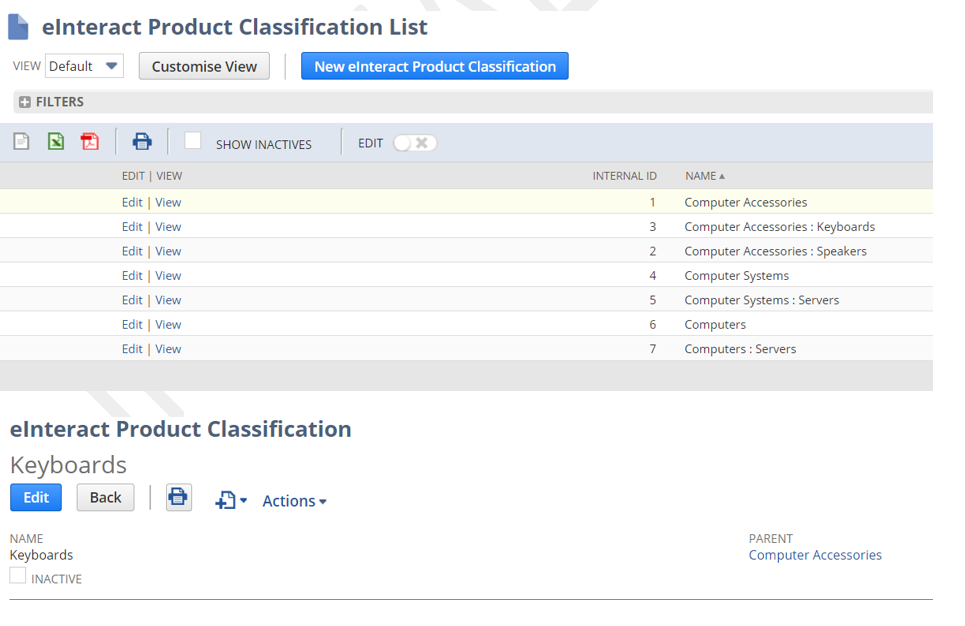
The second level (e.g. keyboards) comes from the Onetrail groupings and the level above (Computer Accessories) is for groupings. This would enable you to report on the total number of Computers you have sold. There is no limit to how many levels you can have.
Permissions
Uses ‘User Permission Type’ so record will need to be added to roles in order for users to create new records.
eInteract Item Mapping
Overview
This enables you to map items, based on their either UNSPSC or Onetrail Category group, into certain groups or to set fields on the Item. This should be set up before you import any Items from Onetrail into NetSuite as these mappings are only used when the item is created not when the item is updated. There is a shortcut for this record which can be found at Lists > Custom Records > eInteract Item Mapping.
The fields that can be set can be seen below:
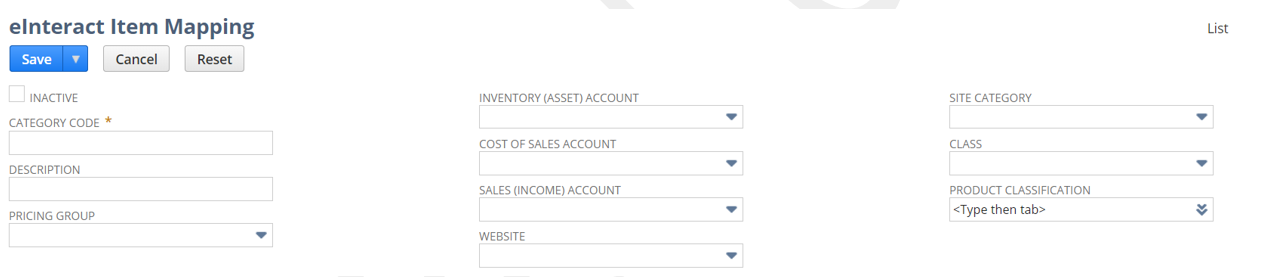
The category Code is what is used to set the fields on the item. As previously stated, this will either be the UNSPSC code or the Onetrail group code. You must identify which one you are using the field Item Group Mapping on the eInteract Configuration page. Using the previous example, for CN01, if we were using Onetrail Groups, the code entered here would be 12620 whereas for UNSPSC it would be 53121706.
Information surrounding the rest of the fields can be found below. You do not need to populate every field, you should only populate those for which you are using.
• Description
o This is just a free text field, does not set anything, it is for reference purposes only
• Pricing Group
o If you have priccing groups enabled and set up, you can select one here
o See section 6.4 for more information relating to Pricingg groups
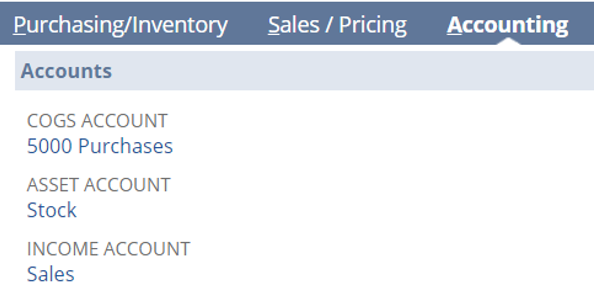
• Inventory (Asset)/ Cost of Sales/ Sales (Income) Account
o These three fields set the account on the item. These are the standard NetSuite accounts that are then used on transactions, and can be found under the Accounting tab on an Item record
• Website
• Site Category
• Class
o If you are using the Class Classification, you can default a Class here
o This will set the Classs field on the Item
• Product Classification
o Sets a product grouping based on list setup from section 6.2
o There is a Custom field called eInteract Product Classification which is set by this
Below is an example of a completed Item Mapping, bar Pricing Group, Website and Site Category:

Once this has been set up, all new items that are created via eInteract/Onetrail that have an Onetrail group of 12380 (this is already set on the Item) will have the fields and values set:
• Inventory (Asset) Account
o Stock (Asset)
• Cost of Sales Account
o Cost of Sales
• Sales (Income) Account
o Sales
• Class
o HP
• Product Classification
o Computer Accessories: Keyboards
Below is an example of such an Item:
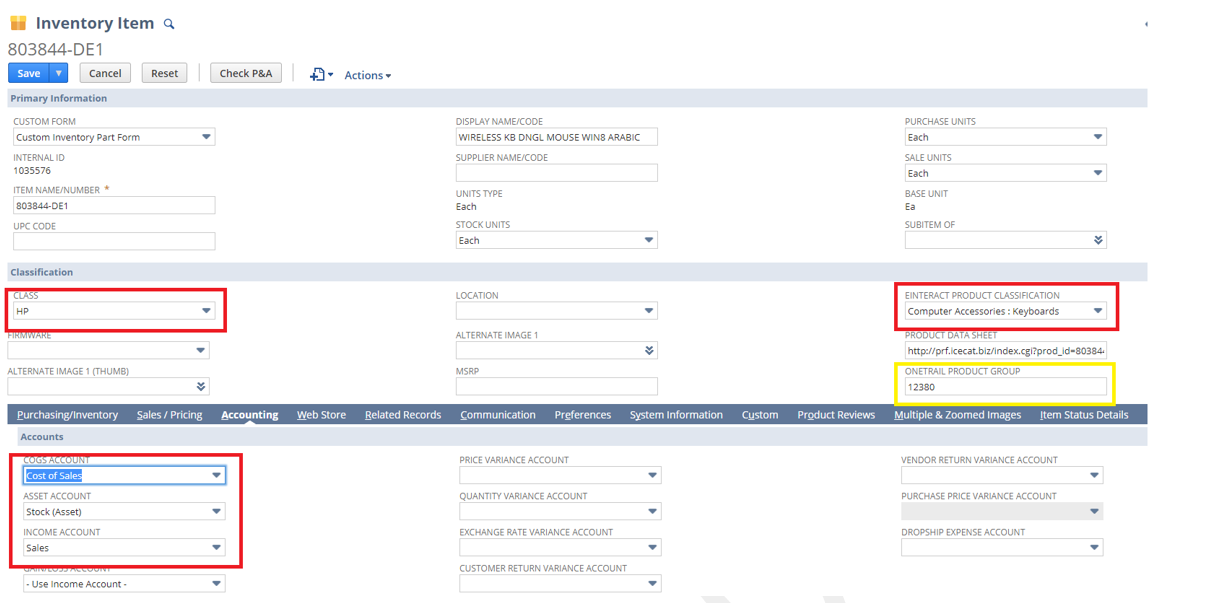
All the fields have been set based upon the field in yellow.
Permissions
Uses ‘User Permission Type’ so record will need to be added to roles in order for users to create new records.
eInteract Pricing Rules
Overview
Pricing Rules can be used to set the Base Price (selling price) on an Item. To enable the use of pricing rules, on the eInteract configuration page tick the box ‘Enable Pricing Rules’. If this is not marked, then no Base Price will be set. This will mean that on every line on a Sales transaction, a user will have to manually set the Unit Price each time.
Once the box has been marked, then pricing rules can be enabled. The pricing rules page can be found at: Lists > Custom Records > eInteract Pricing Rule.
Permissions
Uses ‘Require Custom Record Entries Permission'
eInteract Saved Responses
Overview
This is not a custom record which you will add records to, instead it should be used for viewing purposes only. It is useful to see how many records are being processed and the status of each, especially the first time the Products/Items are imported. There is a shortcut at: Lists > Custom Records > eInteract Saved Responses.
This shows a list of all of the responses that have been processed by the scheduled scripts from Onetrail. The different information it shows is:
Message Type
o 5 different options. However we will only be receiving one of 4 types:
Product Information
• Creates and updates Items
Order Response
• Updates PO to let us know if the PO has been received and accepted by the Supplier
Despatch Advice
• Notification of Supplier delivering the goods. Will create either an Item Fullfillment (if a drop ship order) or an Item Receipt (if non drop ship order) record in NetSuite
Invoice Notification
• Will create a Supplier Invoice/Bill in NetSuite when the Supplier creates an Invoice
• Status:
o 3 options
Downloaded
• Script to process the saved response has not run yet
Processing
• Script is currently running and processing the record
Complete
• Script has completed and record has been processed
• Records Processed
• Error Count
No records should be edited in here, they should be used for viewing purposes only. The views can be customised to Add filters etc. Messages will only be stored here for the number of days specified in the field ‘Number of Days to Keep Saved Responses’, after that the records will be deleted.
The records can be viewed and it is possible to view the XML file that is retrieved from Onetrail. The file is attached to the saved response under the files tab. The message body states the internal id of the file and should not be overwritten.
Permissions
Uses ‘User Permission Type’ so record will need to be added to roles in order for users to view records.
Sales History Search
Overview
This enables you to see the most recent Sales Price paid, and/or other information, for each item on a Sales transaction. A custom field is added to Sales transactions called ‘Sales History’ which shows information defined in the custom record. Before anything should be set on the record itself, a new Saved Search of type transaction should be created. The saved search builds the foundation for the results that should be returned on your Sales transaction. For example if you want to see the last price paid for a particular item, you must include the Item Rate field in your search. Also you must decide what transaction the historic sales price should be picked up from, e.g. a Sales Order or from an Invoice. An example of a saved search is below:
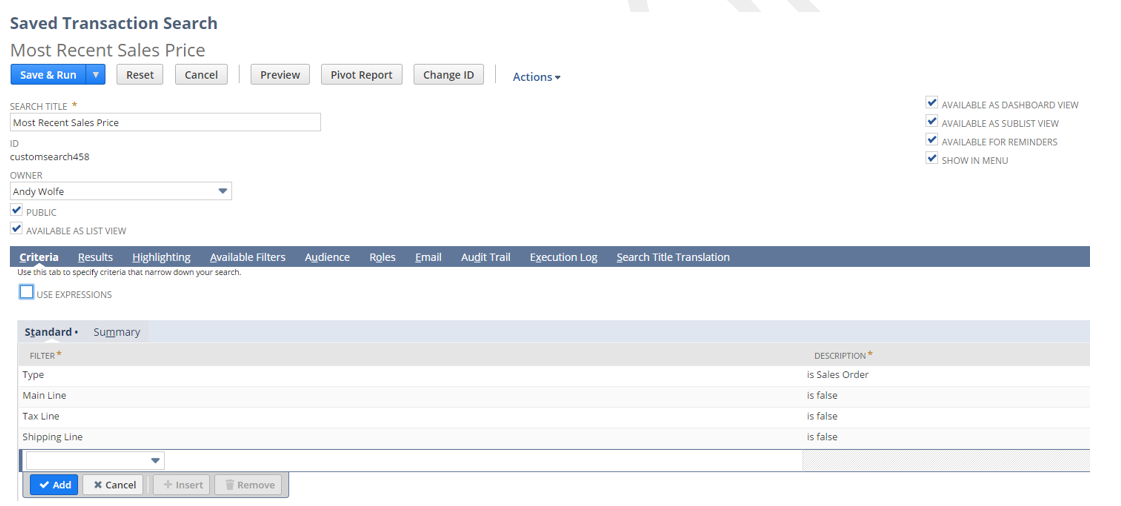
As you can see from the above screenshot, on the Criteria tab the type is set as Sales Order, meaning that the results will be returned from Sales Order transactions, rather than an Invoice.
This will return results in the saved search as below:
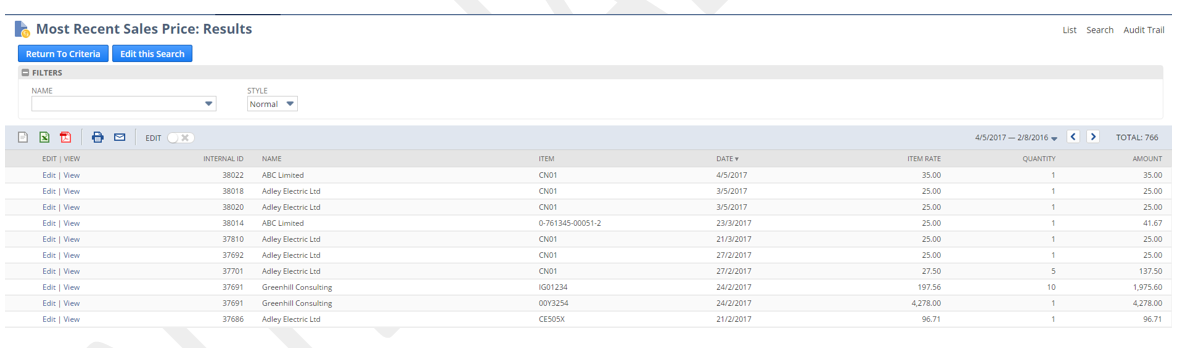
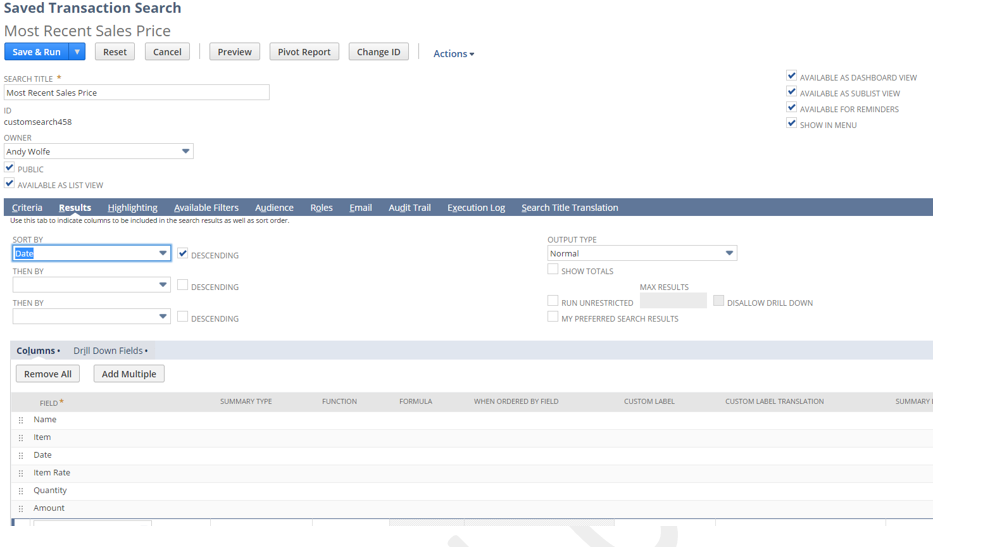
Note to get the most recent price at the top of the search, make sure the Sort By is set as Date and then in Descending order.
In order for the results to display on your Sales Transactions in the field ‘Sales History’, records must be created against the new record - ‘Sales History Search’. When creating a new record, there are four fields that need to be completed. The name should be unique and this will be shown up before the result on your sales transaction. In the Saved Search dropdown select your Saved Search that you have created to return the results. The Search column needs to contain the syntax of the column you want the result to be returned from. For example for Item Rate the syntax is ‘rate’. The field help provides info. If the Filter by Customer column is not ticked, then results will be returned for all Customers, if it is ticked, it will only look to return results for that Customer.
Information will now display on Sales transactions in the column field called ‘Sales History’ that needs to be displayed on the forms in order for results to be displayed. The field is un-editable and returns the results from the Saved Searches that you have created.
Permissions
Uses ‘User Permission Type’ so record will need to be added to roles in order for users to create new records.
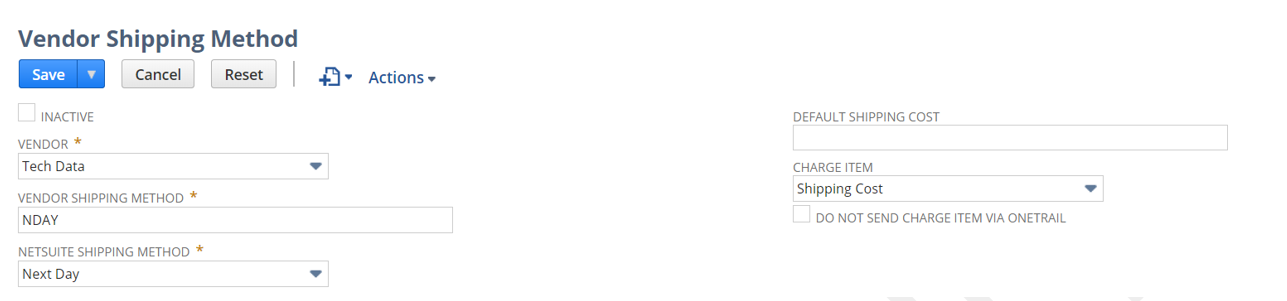
Vendor Shipping Method
Overview
This enables you to map a Vendors/Suppliers shipping method to NetSuite Shipping Methods. There are two benefits to this:
1. Have shipping methods automatically added to PO’s on drop ship orders
2. Link the Suppliers shipping method names to NetSuite’s so that lines do not get rejected by Onetrail
There are six fields that can be populated:
1. Vendor
a. The Vendor/Supplier that this method applies to.
b. This is a drop down of all Suppliers/vendors set up in NetSuite
2. Vendor Shipping Method
a. This is a free text field
b. This information can be provided by the Supplier/Vendor
3. NetSuite Shipping Method
a. These are the NetSuite Shipping Methods available from Lists > Accounting > Shipping Items
4. Default Shipping Cost
a. Can enter a default shipping cost, however this is better set against the Item
5. Charge Item
a. Which Charge Item should be used for Delivery costs to be added to the drop ship PO
6. Do not send Charge Item via Onetrail
a. Flag to indicate whether or not a charge item is included on the purchase order sent to Onetrail.
An example of a completed record is shown below:
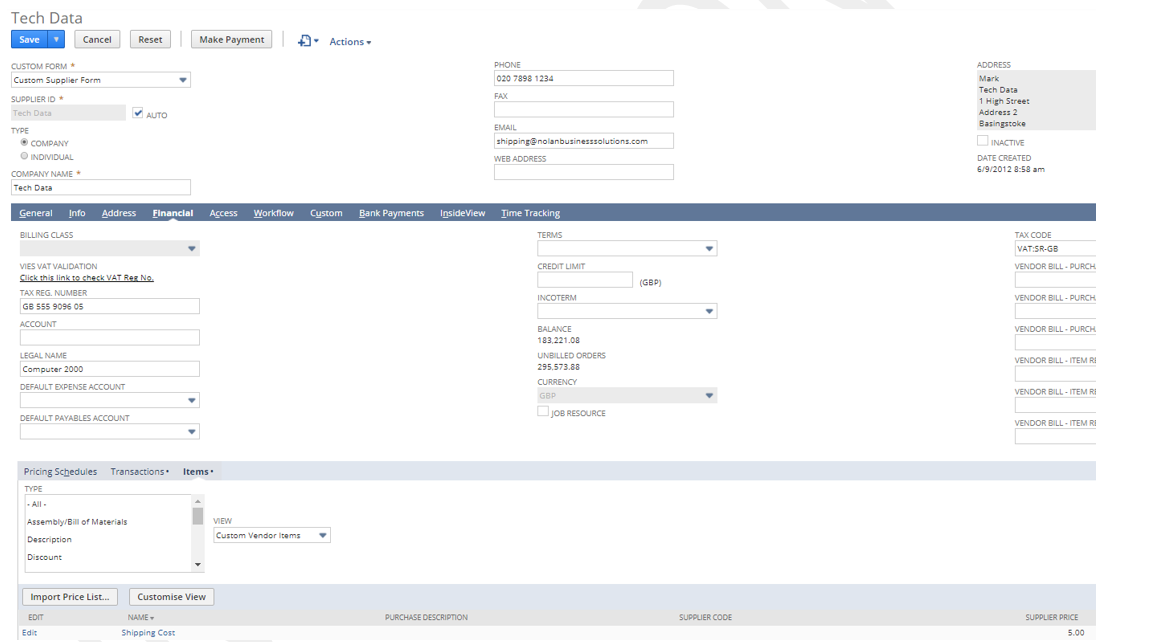
It is also possible to add a Price against that Supplier for that Shipping method:
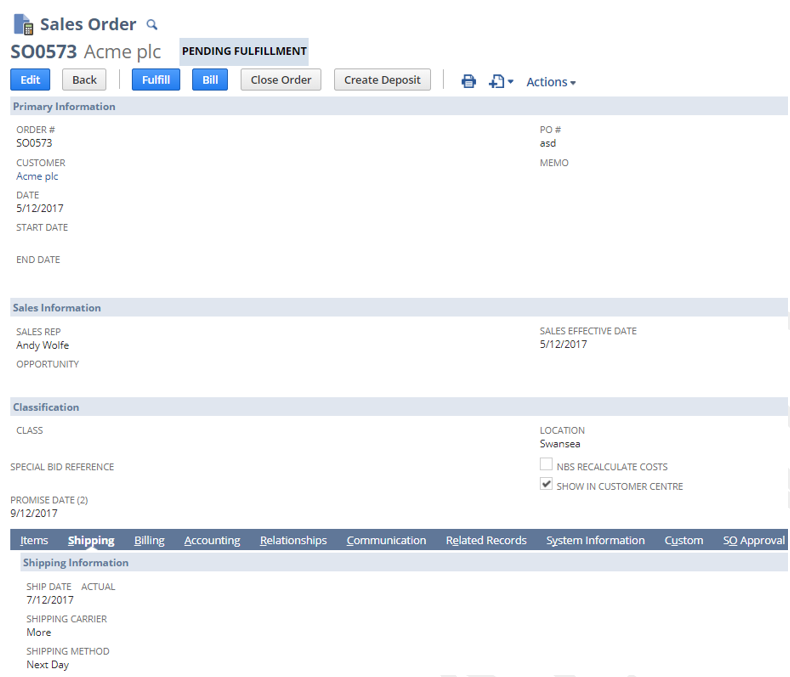
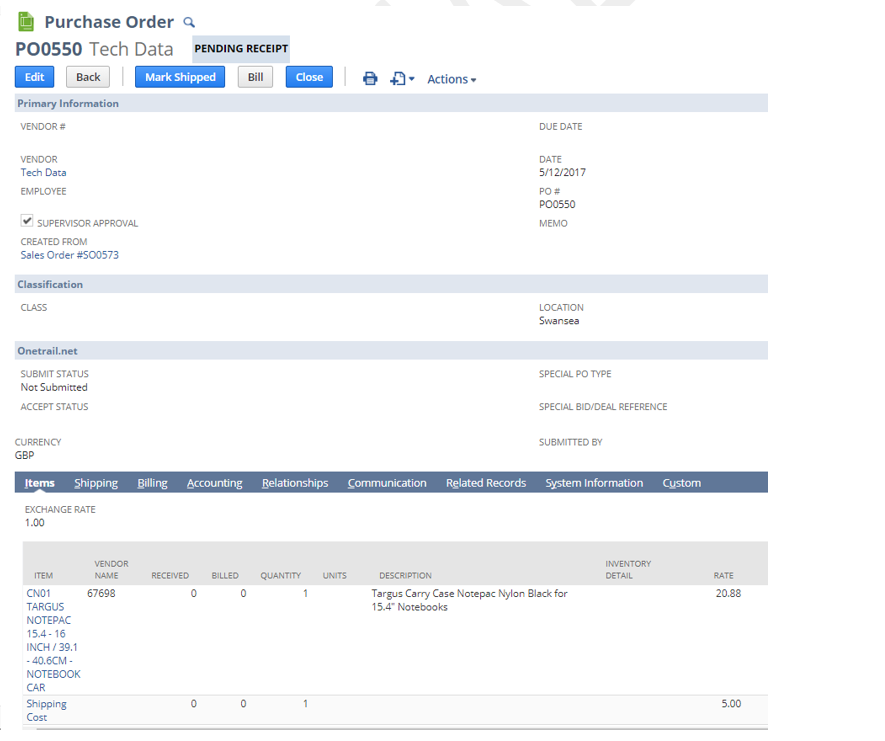
When a SO is created that includes Drop Ship lines, where the Vendor is selected as Tech Data, and Next Day is selected as the NetSuite Shipping method, then a line will be added onto the automatically created PO, as the item Shipping Cost with a rate of £5:
Permissions
Uses ‘Require Custom Record Entries Permission’
