This section provides procedures that will assist you in setting up Nolan Business Solutions Electronic Payments module. Setup procedures generally need to be completed only once, but you may want to refer to this section at other times for instructions on modifying or viewing existing entries.
The following checklist lists the procedures you’ll need to complete to set up your Electronic Payments module.
1. Setup System Information
2. Setup Bank Payment Definition
3. Setup Vendor Specific Data
4. Setup Employee Specific Data
5. Add Filter to Pay Bills page.
Setup System Information
The setup procedure generally needs to be completed only once but may be modified at a later date. Only an administrator may access setup system information. The system setup process must be run for each bank payment definition.
To setup system information:
1. Go to Electronic Payments > System > Setup.
2. Settings subtab
a. Subsidiary – Select subsidiary if installed in a One World account. Leave blank for single company account.
b. Default Bank Account - Select from the drop-down list of Accounts, the default bank account that will be used to pay bills by electronic payment.
c. Default A/P Account - Select from the drop-down list of Accounts, the accounts payable account that will be affected by electronic payment transactions.
d. Default Setting For Print Voucher – Select the default setting for ‘Print Voucher’ checkbox on Electronic Payments window.
e. Exclude Payment Discount Columns – If you receive early payment discounts from vendors, leave blank to display discount transaction columns on payment screen. NB. Display of discount columns will limit the number of bills to a maximum of 90 on the payment screen.
f. Timezone – Select time-zone from list.
g. Remove Attached File From Completion Email – Check this box to remove the attached from the email that is sent to the user when the payment process is complete. The file may be downloaded from the bank payment definition.
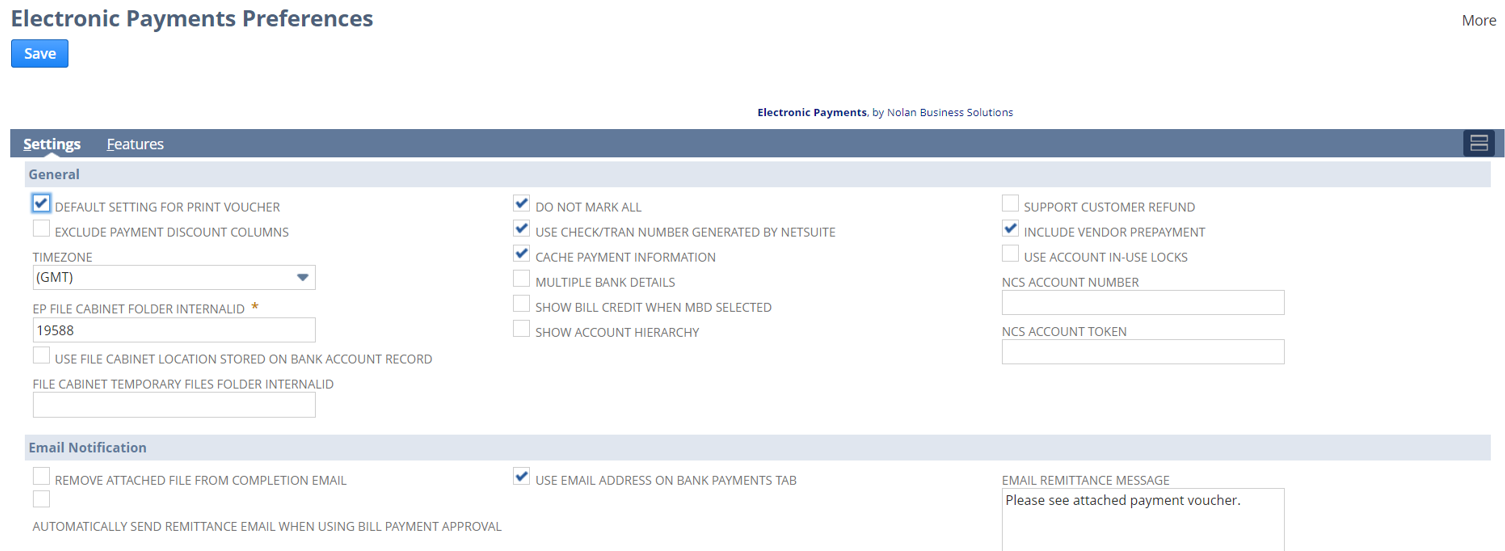

3. Features subtab
This is for internal use only and cannot be edited by the user. It displays a list of enabled features.

Setup Bank Payment Definition
The bank payment definition record defines the records and fields that required in the file sent to the bank.
Main Subtab
Go to Electronic Payments > Lists > Bank Payment Definition > New

1. Name - Enter a definition name, usually referring to the bank or payment type to which the payment definition applies. E.g. NatWest Bankline.
2. Short Name - Enter a short name for the definition. This is used as the basis for the filename used when saving the file. E.g. NWB. Alpha characters only.
3. Payment sequence # - This is the payment sequence number, incremented each time an export file is created, and used as the number part of the filename (4 digits). This filename is also applied as part of the payment reference, for tracking purposes. E.g. NWB0045. Defaults to zero.
4. Last payment extract date - This is the date up until which the last payment extract was run, updated when the payment proposal is processed. Defaults to today’s date.
5. File type - Select a file type from the drop down list. This type specifies the basic type of file which is to be populated. Currently, Fixed Format and CSV files are supported and additional files types should NOT be added by the user. This field is mandatory.
6. Filename extension – Select a filename extension from the drop down list. The filename extension specifies the suffix to the name of the export file. Currently, .csv and .txt are supported and additional extensions should NOT be added by the user. This field is mandatory.
7. Include Column Names – Check this box to include the column name in the body of the export file.
8. Header – Check to indicate that the bank file format includes a file header record.
9. Footer – Check to indicate that the bank file format includes a file footer record.
10. Remittance – Check to indicate that the bank file format includes a remittance record.
11. Truncate To Length – Check this box to specify that data must be truncated to field length. The default is true.
12. Pad To Length – Check this box to specify that data must be padded to field length. Text fields are padded with spaces and numeric fields are padded with zeros. The default is true.
13. Decimal Separator – Select from the drop down list the character to be used as decimal separator. Currently, comma, dot and space are supported.
14. Thousands Separator – Select from the drop down list, the character to be used as thousands separator. Currently, comma, dot and space are supported.
15. Sub Records of – If the file must be transmitted in sub-records, enter the number of required characters.
16. Separate Payment For Each Bill - Check this box to create a separate bill payment for each bill. Leave unchecked to create one bill payment per vendor.
17. Preview - Displays a sample of row output when the ‘Make Row’ button (visible in Edit mode only) is clicked. Sample data is only displayed if a vendor has been set to be paid by the bank definition being tested and a bill payment is listed under that vendor.
18. Click Save.
The bank payment definition is further defined by a series of records, which define the columns/fields in each row of the bank export file.
Transaction Subtab
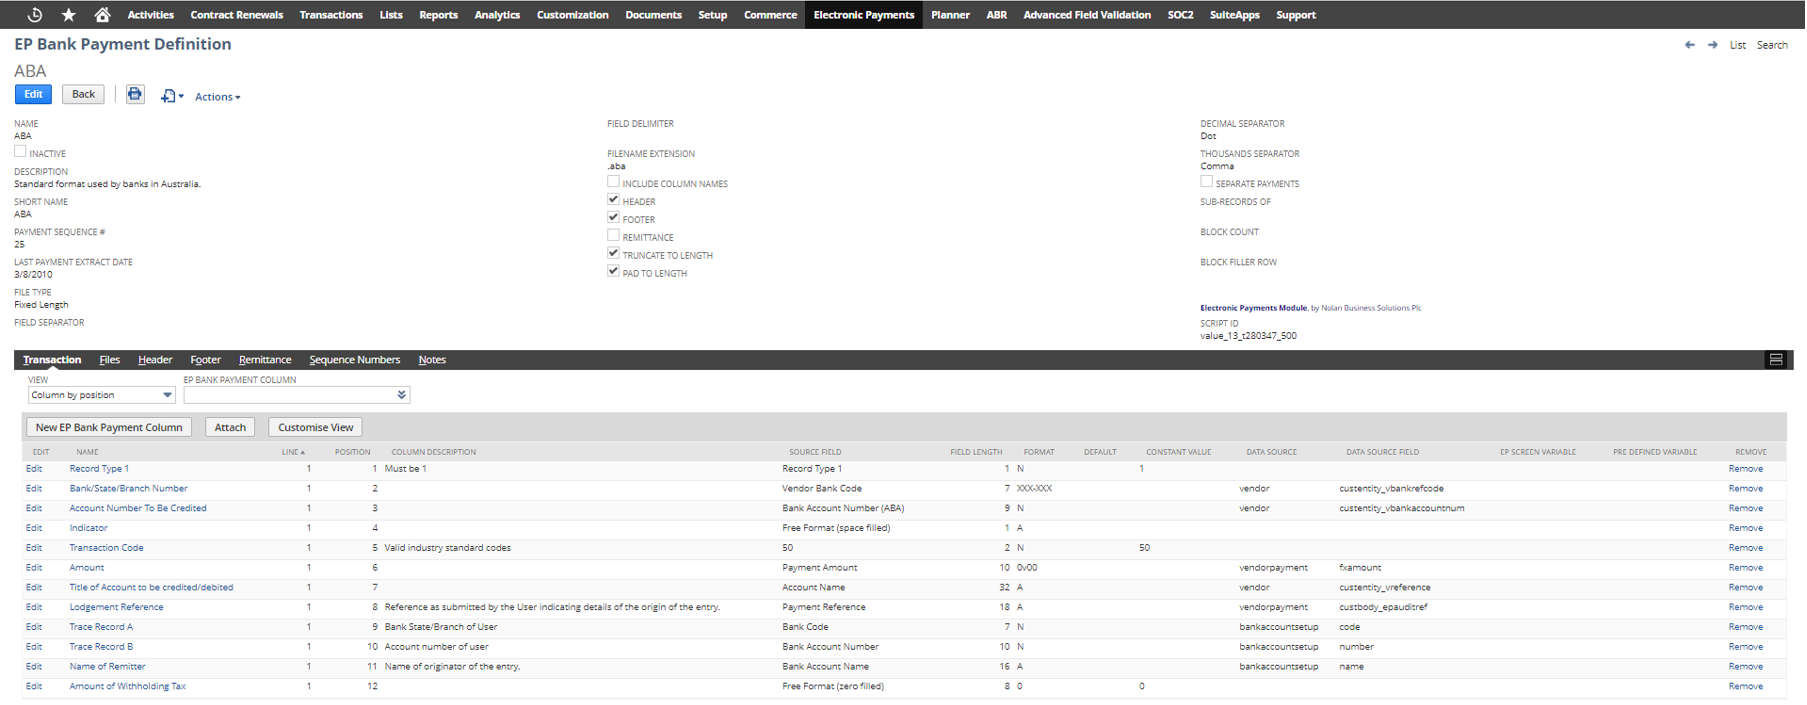
The transaction subtab lists the column definitions for the transaction record i.e. the body of the file. This record contains generic information about the payment. For example the payee's name, account number and the payment date.
1. Go to Electronic Payments > Lists > Bank Payment Definition and click View next to the Bank Payment Definition to be defined.
2. To add a new column, click the button New EP - Bank Payment Column.

3. Name – Enter a name for the column. This name is applied to the export file if ‘Include Column Names As Header’ has been checked. It is usually used for reference only as a field tag.
4. Column Description – Enter a description of the data. E.g. Destination Sort Code.
5. Position – Enter the position of this column in the export file. The position indicates the field number this field will occupy within the row. So if the position was 3 then the field would occupy the third field along in the row like so:
‘Field 1’,’Field 2’,’Field 3’,’….
NB. Column numbering must be consecutive.
6. Line – Leave blank for the body of a bank payment definition.
7. Bank Payment Definition - The bank payment definition to which this bank payment column belongs.
8. Header – Leave blank for the body of a bank payment definition.
9. Footer - Leave blank for the body of a bank payment definition.
10. Remittance - Leave blank for the body of a bank payment definition.
11. Source Field – The source field is the actual source of the data for the export file. The fields are derived from the electronic payments processing screen, the bill payment transaction, the vendor or employee record, a pre-defined variable, a user defined constant or a simple expression. For flexibility, the same field may be used in multiple positions in the export file.
Select a source field from the drop down list or click New to create a new source field. See below for instructions on how to create a new source field.
12. Default – Enter a default value to be applied if the source data is blank.
13. Field Length – Enter the length of the data field. This field is mandatory.
14. Format – Enter the format to be applied to the data field. The format is dependent on the field type of the source field, i.e. text, numeric, date or time. The format selected must be applicable to the field type of the source field.
A list of formats is given in Appendix I.
To create a new source field:
Go to Electronic Payments > Lists > Field Source > New

15. Name – Enter a name for the source field.
16. Field Source Type – Select from the drop down list, a field type. If the selection is:
i. Screen Variable – In the EP Screen Variable field, enter the field internal ID of the screen variable. See Appendix II for a list.
ii. Pre-Defined Variable – In the Pre-Defined Variable field, select from the drop down list the variable required.
iii. NetSuite Data Field – In the Data Source field, enter the internal id of the source record e.g. vendor, billpayment.
In the Data Source Field, enter the internal id of the record field i.e. total, custentity_vbankrefcode. NB. Correct spelling is essential.
iv. Constant – In the Constant field, enter the value of the constant.v
v. Expression – Expressions are used to dynamically calculate values based on field data in the system. See Appendix II for syntax and sample expressions.
vi. Sequence Number – Select from the drop down list or click Add New to create a new sequence number record (see below).
17. Field Type – Select from the drop down list, the type of data field selected.
Sequence Numbering
Sequence numbering is used in bank import files for two important reasons:
- To prevent unauthorized changes in data.
- To prevent duplicate transmissions of payment orders.
An example bank payment definition for a comma separated value (CSV) text file (.txt) with no header or footer is shown below:
Header and Footer Subtabs
The Header and Footer subtabs list the column definitions for the header (start of batch) and footer (end of batch) records, respectively. Only one header and record is defined per file.
To include a header definition:
1. Click the Header or Footer subtab.
2. Click New EP – Header or New EP - Footer.

3. Enter a name for the Header or Footer.
4. Select the bank payment definition.
5. The header or footer is further defined by a series of EP – Bank Payment Column records similar to the body of the bank definition.
6. To add a new column, click the button New EP - Bank Payment Column.

7. Enter the column name.
8. Column Description – Enter a description of the data. E.g. Destination Sort Code.
9. Position – Enter the position of this column in the export file. The position indicates the field number this field will occupy within the row. So if the position was 3 then the field would occupy the third field along in the row like so:
‘Field 1’,’Field 2’,’Field 3’,’….
NB. Column numbering must be consecutive.
10. Line – Enter the line number.
11. Header Definition – Select the header definition. Leave blank for the body and footer of a bank payment definition.
12. Footer Definition – Select the footer definition. Leave blank for the body and header of a bank payment definition.
13. Bank Payment Definition – Leave blank for a header or footer definition.
14. Source Field – The source field is the actual source of the data for the export file. See above for details of how to enter a new source field.
Example file output for a bank payment definition with a header and footer is shown below:
Header - VOL1CRTST2 945945 1
HDR1A945945S 1945945CRST2 00010001000101 08287 08287 000000HEXABC
HDR2F0200000100 00
UHL1 08287999999 000000004 MULTI 051 AUD0010
Body - 7788991234567809967553208976567 00000146875TESTING WAVELL PLC 08287
6666650892861209967553208976567 00000006580TESTING DAVE'S EMPORIUM LI 08287
7788997033923309967553208976567 00000021785TESTING TEST IT LTD 08287
Footer - 6755880897656709967553208976567 00000175240CRTEST0001 CONTRA NOLAN COMPUTERS PL 08287
EOF1A945945S 1945945CRST2 00010001000101 08287 08287 000000HEXABC
EOF21F0200000100 00
UTL10000000175240000000017524000000030000003
Remittance Subtab
The Remittance subtab lists the column definitions for a remittance record. This record, sometimes referred to as an invoice record, contains information about each individual invoice which is to be paid to the payee according to the transaction record. The record is created in a similar way to header and footer records as above.
Example file output for a bank payment definition that requires a remittance record is shown below:
Transaction - AH200TBII0206000009 04BETFOR2188776655443123456780990440
090206 12345678987NORWAY PLC MA
NSION HOUSE 21051 FREEWAY W1 5TY LONDON
000000000000000601F 000000000000000 000000000000
Remittance - AH200TBII0206000010 04BETFOR2388776655443123456780990441
0021000000145656765
000000000015000D 000
Remittance 000000000015000D 000
AH200TBII0206000011 04BETFOR2388776655443123456780990442
0021000000145667654
000000000010000D 000
Setup Vendor Specific Data
Vendor specific data is used in the export file to identify to the bank the beneficiary’s details. The data set-up will be specific for that bank code number, account number and account reference (account holders name). If the vendor is to be paid via Electronic Payments, this must be indicated on the vendor’s record.
To setup vendor data:
1. Go to Lists > Relationships > Vendors.
2. Click Edit next to the vendor name and Bank Payments subtab.
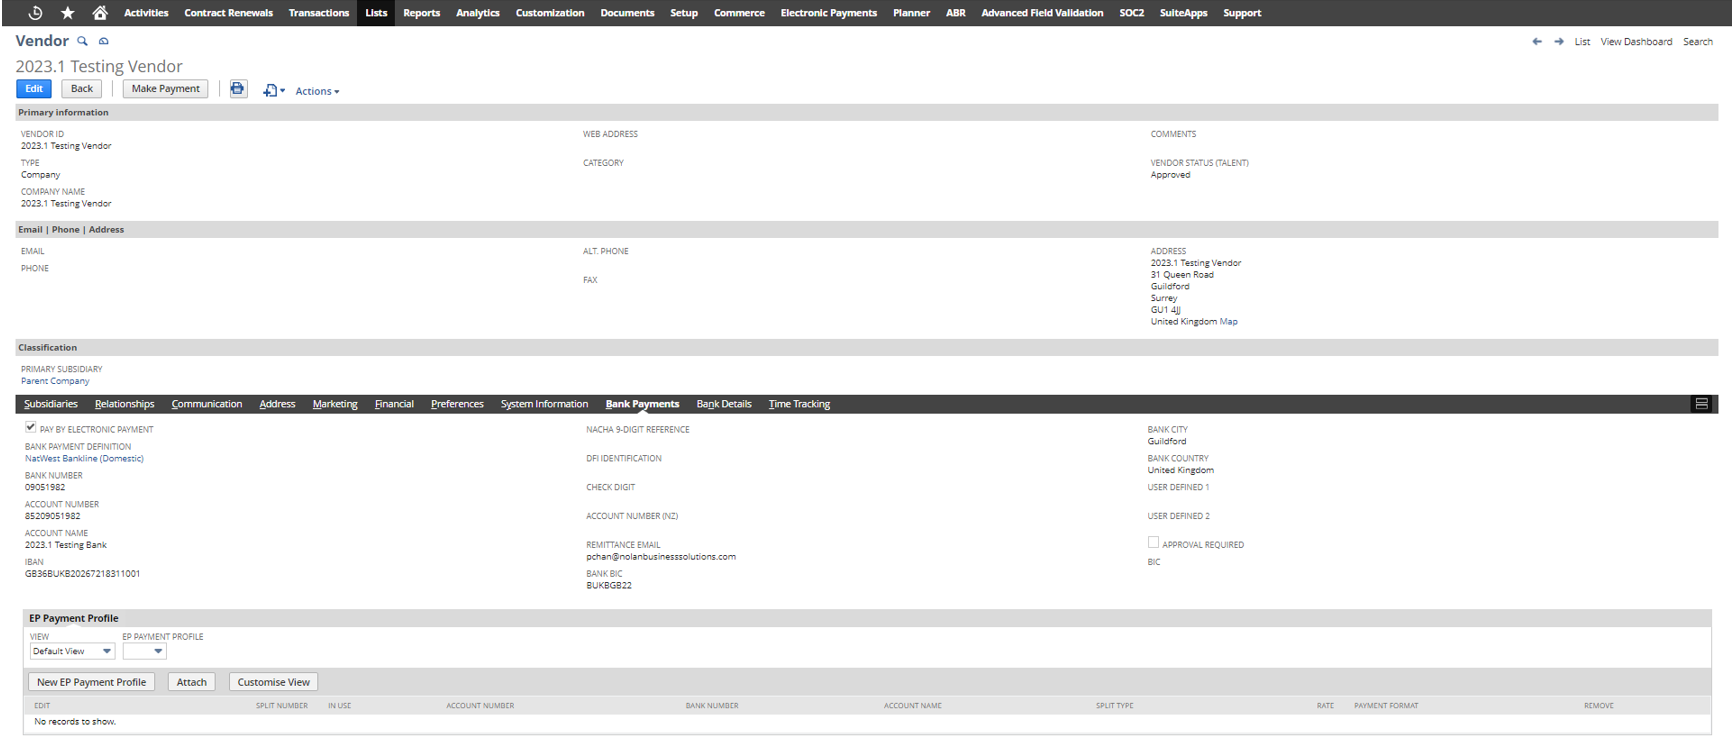
3. Pay By Electronic Payment – Check this box if the vendor is to be paid by electronic payment.
4. Bank Payment Definition – Select from the drop down list, the bank payment definition to be used to pay the vendor.
5. Bank Code Number – Enter the vendor bank code, known as sort code in the UK and is the code that uniquely identifies a bank.
6. Account Number – Enter the bank account number that the vendor maintains at bank and is the account to which payments are made.
7. Account Reference – Enter the name of the account that the funds will be paid into.
8. Custom entity fields may be added to the vendor record to specify other details required by the bank format, such as BIC and SWIFT numbers.
9. Electronic Payment Installment - If you pay bills from this vendor by installments (e.g. by standing order or direct debit), you may enter an optional electronic payment installment for your purchases from this vendor. When you Pay Bills By EP, the payment amount will default to the figure entered here for any bill for this vendor.
Setup Employee Specific Data
Employee data is setup in a similar manner to a vendor.
To setup employee data:
1. Go to Lists > Employees > Employees.
2. Click Edit next to the employee name and then the Bank Payments subtab.
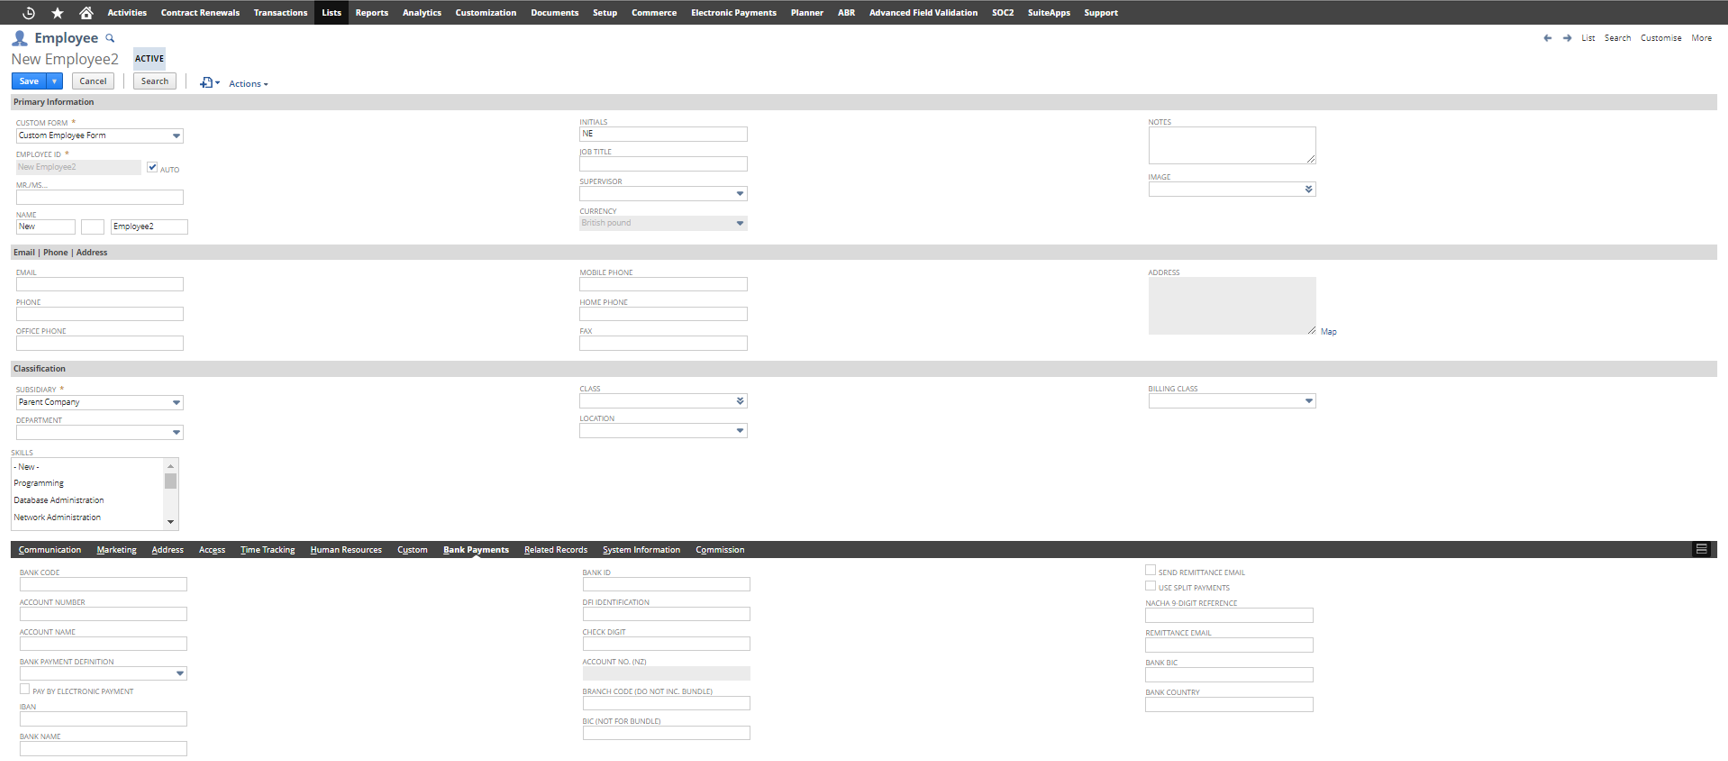
3. Pay By Electronic Payment – Check this box if the employee is to be paid by electronic payment.
4. Bank Payment Definition – Select from the drop down list, the bank payment definition to be used to pay the employee.
5. Bank Code Number – Enter the employee’s bank code, known as sort code in the UK and is the code that uniquely identifies a bank.
6. Account Number – Enter the bank account number that the employee maintains at bank and is the account to which payments are made.
7. Account Reference – Enter the account name.
8. Custom entity fields may be added to the vendor record to specify other details required by the bank format, such as BIC and SWIFT numbers.
Add Filter to Pay Bills
To add an additional filter and column to the Pay Bills page:
1. Go to Transactions > Purchases/Vendors > Pay Bills.
2. Click the Customise button.
3. Click Additional Columns subtab and check the box next to Vendor : Pay By Electronic Payment.
4. Click Additional Filters subtab and check the box next to Vendor : Pay By Electronic Payment.
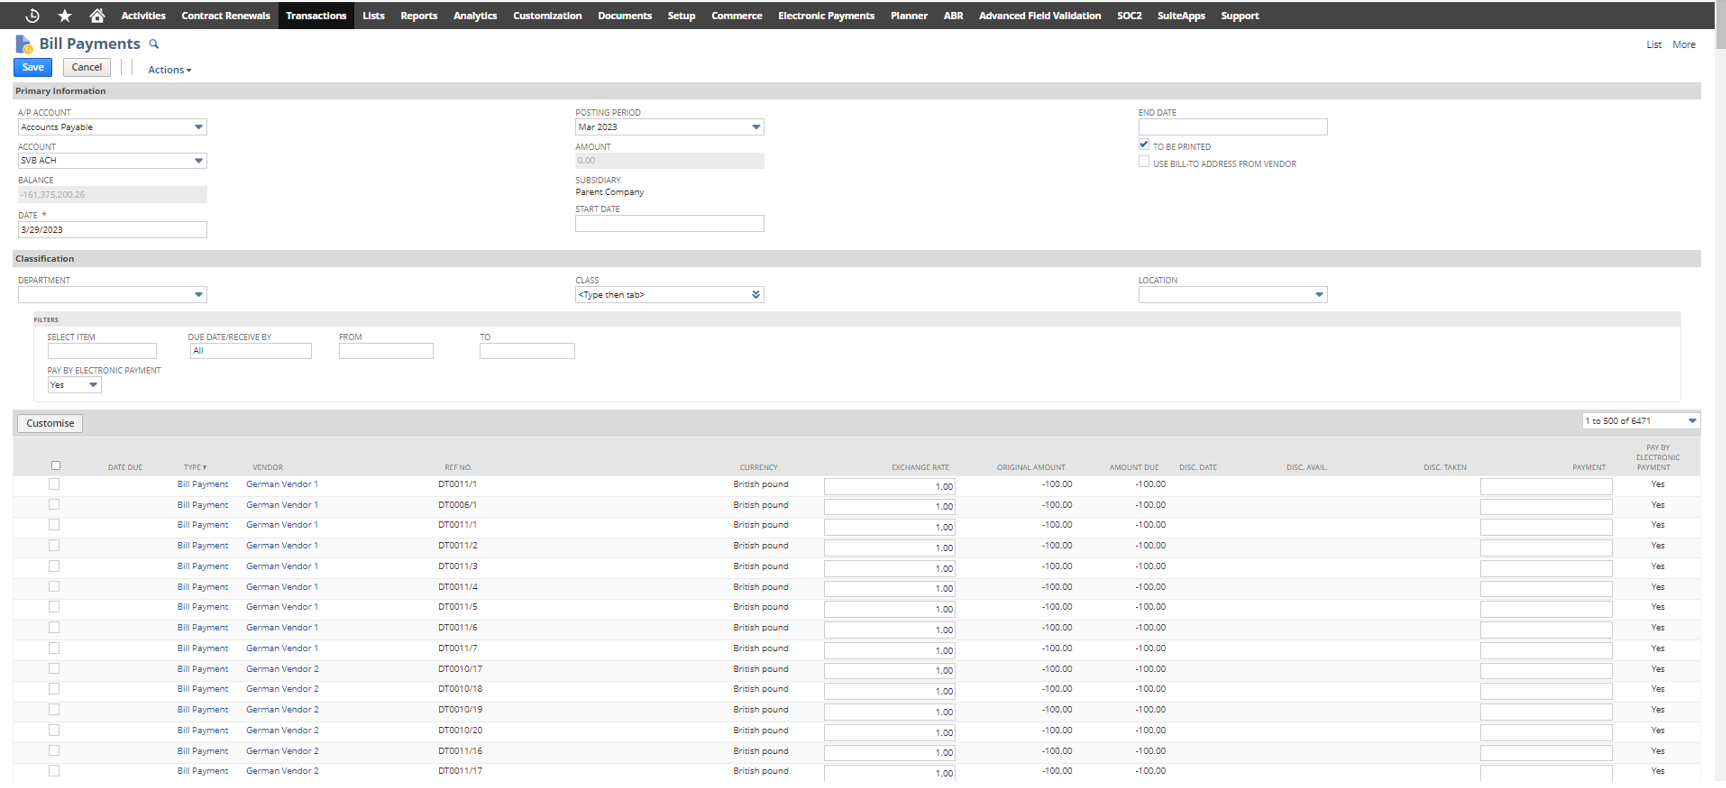
NB. The additional filter and column will only apply to a vendor bill and not an employee expense report. This is a NetSuite issue.